"When you win something on Ebay, you will inevitably find it parted out at your favorite e-tailer the very next day."
So... Hot Toys Royce has arrived on the web, and originally I had preordered 2 of him boxed. This morning I realized that he really didn't have enough stuff that I wanted him boxed, I just wanted the Adrien Brody headsculpts. So I cancelled my preorders and decided to just get the headsculpts. So I was bidding on one on ebay. I knew that if I didn't get one on ebay that my favorite e-tailer Toy Anxiety wouldn't part him out... but I also knew that the moment I won the head on ebay, that tonight when I looked on their site, they would have. So I won the head for about $46 shipped... and of course, lo and behold, Toy Anxiety has him parted out tonight. This of course was not particularly a bad thing, as I did want two of his heads, so I bought a second one for a bit less than I paid for the first, so I'm happy.
So, today I got some other things in the mail... I got the replacement casing for my Crackberry (no literally, the outer screen shield was cracked), my WWI DML Long Barreled Artillery Luger Pistols (one of them is the property of Darla), and some aluminum sheet for a project.
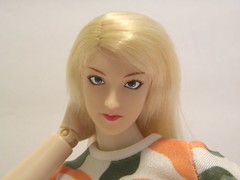
As for stuff in the works, I repainted Darla's eyes, I liked her head factory, but I wanted to really make her a bit more "mine" so I repainted her eyes green... it also let me try out a new color I got... "Wasabi"...
OK, so that's about it for now, stay tuned and thanks for following.

20 November 2010
16 November 2010
After Show Report
Hi Everybody,
Just a quick blurb about the New Jersey Collectors Con in Cherry Hill this past weekend. There wasn't a great turnout of 1/6th (Arianne02 & Wax Murderer, Dr. Wild, and Myself only), the show was dominated my small scale G.I.JOE and Transformers... and some amazing cosplay. Perhaps future shows might have a bit better turnout, but at least the show wasn't a complete bust.
I'd like to thank everybody who came and who purchased stuff from me. It was great meeting new people (glad you were able to make it Rosi! and thanks for buying so much stuff :) )
So just a quick shout out and thanks, and stay tuned for more postings in the coming weeks.
Thanks for following!
13 November 2010
Goodies and stuff currently in the works...
OK, so I've gotten the beret flocking tutorial out of the way, and that was really fun. In the coming week or so I'd like to do a few more flocked berets as well.
I'll be getting some aluminum sheet soon for a forthcoming project. I'm hoping it will go as well as planned, and if so, I'll be sure to do a tutorial on it as well.
So, I got some goodies this week... it's funny that I'm going to a show tomorrow to get rid of a lot of stuff, all the while still buying more. So I placed a couple orders this past week between my favorite online shops for some loose parts. The majority of that stuff has arrived and been sorted into it's relative projects.
The goodies that I've ordered:
2 x loose Hot Toys Prince of Persia "Sands of Time" Daggers from the Dastan figure. I always love neat stuff like that for artifacts and relics for my adventurers.
1 x loose Hot Toys Jill Valentine head.
2 x pairs loose Hot Toys Jill Valentine boots.
1 x loose Hot Toys Abigail Whistler head.
2 x loose Hot Toys Abigail Whistler boots.
1 x loose set of Soldier Story U.S. Navy SEAL SDV "Mechanix" Gloves.
6 x loose Soldier Story black 20 round PMAGs.
4 x loose Dragon WWII German Artillery Lugers with stocks and drum magazines.
1 x loose Sideshow Indiana Jones bendy whip.
1 x loose BBI Rosanna Jones ACU uniform. I'm only using the pants though, the jacket was a piece of crap.
1 x Dollsfigure khaki shirt / shorts outfit.
And lastly just some various assorted pieces such as spare ankle balls for Hot Toys bodies, some various extra posed hands from the recent Hot Toys female releases.
So, what are these things going to? Well:
The ACU pants and a pair of the Jill Valentine boots are going to my upcoming spokesmodel for this blog: Cody Lynn Sorenson
You've seen her before showing off my HALO minifigs, she will be taking up a full time job as my scale reporter and model for this blog.
The Dollsfigure khaki outfit, Hot Toys Abigail head, Indy whip, and some other stuff like one of the daggers from Dastan will be going to make my new classic B Movie heroine "Darla Dauntless".
So stay tuned and thanks for looking everyone.
11 November 2010
QUICK AND EASY FLOCKING TUTORIAL
Hey All,
As I mentioned in my previous post, I would be having a quick tutorial of how to do quick and easy flocking on a beret.
I started out with making a USAF Security Forces Airman about two years ago now (time flies). I based the figure on the Airmen I had seen at McGuire AFB in New Jersey during the air show in 2008. So I've had this figure around for a while and had kept wavering on what type of cover to give him. I had a Patrol Cap that went with his ABUs, but it just didn't fit or look right on the head I was using. USAF Security Forces wear dark blue berets, however there aren't any pre made Security Forces berets out there. So as I said, this guy just stayed cover less for the time being... until the day before yesterday.
Whilst cleaning stuff up and sorting my collection in readiness for the show this coming weekend, I came across the Hasbro Classic Collection molded beret. These berets had nice sculpting but were often a tad large on Hasbro heads... something that was not an issue with the slightly larger noggins of an Hot Toys head. So after setting it on the head, I decided that this was going to be just what he needed.
So I grabbed some blue paint and painted the beret up. Something was still off. All the high end gear that the figure had, the beret just didn't stand out being simply painted plastic... So I thought about flocking.
So I took a run down to Michael's Crafts and picked up some supplies, drove back home, and then turned a lackluster piece into something to really set the figure off and complete him.
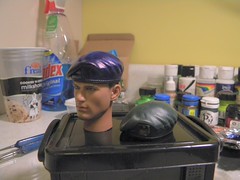
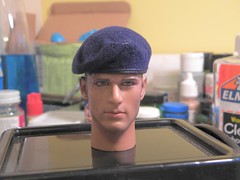
So we start with the beret on a spare head on the left and an original beret on the right. I used a spare HT head during this process, as for any type of headgear painting, it just helps to have a "sacrificial" head to aid in holding the item for painting.

Starting from the beginning, as this is supposed to be a tutorial, we'll start with the painting. I started by using Games Workshop Citadel Color Midnight Blue and I added some Americana All Purpose Sealer / Adhesion Promoter to it to ensure a good bond to the plastic.

Just grab a brush, doesn't have to be super fancy, but it does need to be able to apply both the paint and later the glue, and be able to keep the glue off the leather band at the bottom of the beret.

Once you have the beret painted with the Midnight Navy (or whatever color your beret will be) let it dry thoroughly.
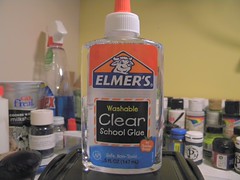
Next up is the glue, I prefer to use Elmer's Washable Clear School Glue. It has a great, smooth, not to thick not to thin consistency that makes it perfect for brushing on. Plus it has a good working time for pieces like this. So once your beret has dried for a good half hour or so, get your brush and paint the beret with a coat of glue. The coating should be decent, but don't over do it. Remember do not get glue on the leather band at the bottom of the beret. Wash your brush out good once you are done with the glue as well, this is one of the reasons I choose the washable glue, it rinses nicely out of the brush and doesn't harm it.
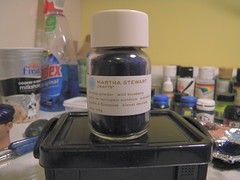
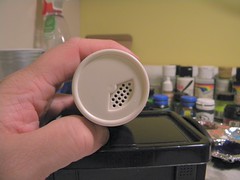
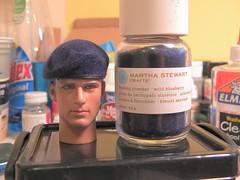
Now for the magic... Martha Stewart Crafts Flocking. I purchased "Wild Blueberry" as that was perfect for what I was working on, though they have a ton of fantastic colors in these wonderful shaker bottles for about 3 bucks a piece. The bottle has both a duster filter and an pouring one.
So quickly after you have put your glue on, drop your brush in your water cup (it will be fine for a minute) grab your flocking bottle and open the top to the "pouring" mouth. You'll be coating your beret liberally... it will seem like you are wasting a lot, but you really aren't (I've done two berets like this and have used less than 1/8th the bottle) you just have to get a good coating. So dust the beret with the flocking and as you go tap and blow on the beret to remove the excess. Do this a couple times going all over the beret and making sure you have a good coating over the whole thing. Once you are satisfied with your coating, finish blowing and tapping the excess off and then leave the beret to dry.

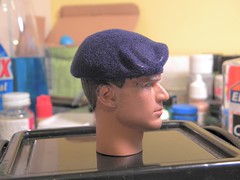
Once the beret has dried, I usually give the glue at least an hour, give it one more blow off, then go back with a fine brush and using black, touch up the leather band.
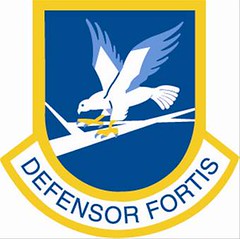
Lastly, to finish the beret off, it needed a flash. USAF Security Forces wear the "Defensor Fortis" flash:
So using some Inkjet Printer Sticker Paper I scaled down the flash image and printed it out for completing the beret.

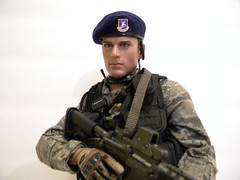
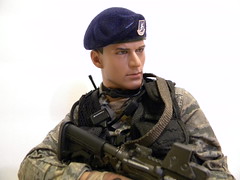
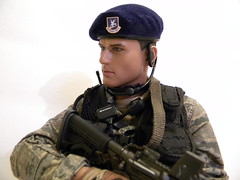
So there we have it, finally, after two years I have completed my USAF Security Forces Airman.
I hope this tutorial can help some people out and of course if anyone has any questions feel free to ask. I will probably be doing a few more of the berets in the future so I'll be showcasing them here as well.
Thanks for checking it out.
As I mentioned in my previous post, I would be having a quick tutorial of how to do quick and easy flocking on a beret.
I started out with making a USAF Security Forces Airman about two years ago now (time flies). I based the figure on the Airmen I had seen at McGuire AFB in New Jersey during the air show in 2008. So I've had this figure around for a while and had kept wavering on what type of cover to give him. I had a Patrol Cap that went with his ABUs, but it just didn't fit or look right on the head I was using. USAF Security Forces wear dark blue berets, however there aren't any pre made Security Forces berets out there. So as I said, this guy just stayed cover less for the time being... until the day before yesterday.
Whilst cleaning stuff up and sorting my collection in readiness for the show this coming weekend, I came across the Hasbro Classic Collection molded beret. These berets had nice sculpting but were often a tad large on Hasbro heads... something that was not an issue with the slightly larger noggins of an Hot Toys head. So after setting it on the head, I decided that this was going to be just what he needed.
So I grabbed some blue paint and painted the beret up. Something was still off. All the high end gear that the figure had, the beret just didn't stand out being simply painted plastic... So I thought about flocking.
So I took a run down to Michael's Crafts and picked up some supplies, drove back home, and then turned a lackluster piece into something to really set the figure off and complete him.
So we start with the beret on a spare head on the left and an original beret on the right. I used a spare HT head during this process, as for any type of headgear painting, it just helps to have a "sacrificial" head to aid in holding the item for painting.
Starting from the beginning, as this is supposed to be a tutorial, we'll start with the painting. I started by using Games Workshop Citadel Color Midnight Blue and I added some Americana All Purpose Sealer / Adhesion Promoter to it to ensure a good bond to the plastic.
Just grab a brush, doesn't have to be super fancy, but it does need to be able to apply both the paint and later the glue, and be able to keep the glue off the leather band at the bottom of the beret.
Once you have the beret painted with the Midnight Navy (or whatever color your beret will be) let it dry thoroughly.
Next up is the glue, I prefer to use Elmer's Washable Clear School Glue. It has a great, smooth, not to thick not to thin consistency that makes it perfect for brushing on. Plus it has a good working time for pieces like this. So once your beret has dried for a good half hour or so, get your brush and paint the beret with a coat of glue. The coating should be decent, but don't over do it. Remember do not get glue on the leather band at the bottom of the beret. Wash your brush out good once you are done with the glue as well, this is one of the reasons I choose the washable glue, it rinses nicely out of the brush and doesn't harm it.
Now for the magic... Martha Stewart Crafts Flocking. I purchased "Wild Blueberry" as that was perfect for what I was working on, though they have a ton of fantastic colors in these wonderful shaker bottles for about 3 bucks a piece. The bottle has both a duster filter and an pouring one.
So quickly after you have put your glue on, drop your brush in your water cup (it will be fine for a minute) grab your flocking bottle and open the top to the "pouring" mouth. You'll be coating your beret liberally... it will seem like you are wasting a lot, but you really aren't (I've done two berets like this and have used less than 1/8th the bottle) you just have to get a good coating. So dust the beret with the flocking and as you go tap and blow on the beret to remove the excess. Do this a couple times going all over the beret and making sure you have a good coating over the whole thing. Once you are satisfied with your coating, finish blowing and tapping the excess off and then leave the beret to dry.
Once the beret has dried, I usually give the glue at least an hour, give it one more blow off, then go back with a fine brush and using black, touch up the leather band.
Lastly, to finish the beret off, it needed a flash. USAF Security Forces wear the "Defensor Fortis" flash:
So using some Inkjet Printer Sticker Paper I scaled down the flash image and printed it out for completing the beret.
So there we have it, finally, after two years I have completed my USAF Security Forces Airman.
I hope this tutorial can help some people out and of course if anyone has any questions feel free to ask. I will probably be doing a few more of the berets in the future so I'll be showcasing them here as well.
Thanks for checking it out.
09 November 2010
Upcoming Projects
I've been a bit busy of late, between a computer crash and preparing for a toy show, I haven't worked on much outside of those two things.
Computer crash was fixed, I have a nice new laptop now, which will also help a bit more with keeping this blog updated more as I'll have my things to work on with me more often.
Secondly, I'll be attending the New Jersey Collector's Con in Cherry Hill NJ this coming weekend
http://www.newjerseycollectorscon.com/
I'll be having a table there to move some older stuff out (hopefully), mostly older military stuff and G.I. JOE Classic Collection stuff.
So in actual hobby related projects, I will be having a tutorial on flocking plastic berets coming within the next week or so as well as some info on another project I am planning on undertaking that I hope works out how I plan...lol
Keep checking back and thanks for following everybody.
Subscribe to:
Posts (Atom)